Why you should carry a first aid kit
If you are a parent, I strongly encourage you to carry a small first aid kit in your diaper bag at all times, even for short trips to the playground. Minor injuries can happen anytime and you just never know when you’ll need it.
Ever since I’ve started toting this first aid kit around, I’ve used it on my kid and helped out numerous grateful parents.
Why build your own first aid kit?
Many store-bought first aid kits are either too bulky for everyday carry or too lacking in what you require. Building your own kit allows you to customize and stock what you need.
First aid kit checklist
Scrapes, cuts, and bruises are some of the most common minor injuries your child will encounter.
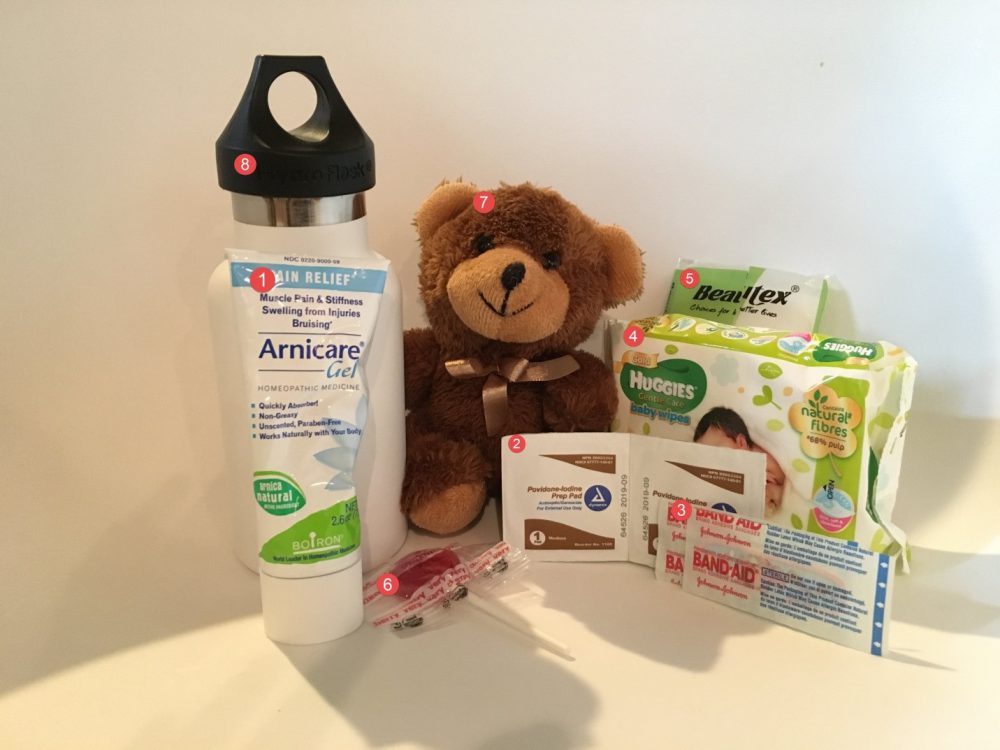
To make an ultra-portable first aid kit, you’ll need:
- Bruise ointment (I like all natural arnica gel for bruises)
- Iodine pads for disinfecting wounds
- Adhesive bandages (I’ve found colorful, character bandages to have magical painkilling effect on kids!)
- Baby wipes (use this to clean your hands)
- Tissues
- Lollipop (great as distraction while you tend to their wound)
*1 quart-sized ziploc bag to hold everything (not pictured)
The following additional items don’t fit in the ziploc bag, but I carry it in my backpack at all times:
- A small stuffed toy (aka the boo boo bear) for providing comfort (the dollar store is great for this)
- A bottle of water
For minor cuts and scrapes
- Wash your hands. If this is not possible, clean your hands well with the baby wipes.
- Calm your child. If your child is hysterical, give them a hug and let them hold the stuffed toy. A lollipop also works wonders here.
- Stop the bleeding. Apply light pressure to the wound with a clean tissue and elevate the wound.
- Rinse the wound. Rinse the wound under running water. If you don’t have access to a tap, use the water from your bottle to flush out any debris from the wound. For minor injuries, you won’t need an antiseptic.
- Cover the wound with a bandage. If the wound is minor, you can also choose to leave it uncovered
- Change the dressing daily. Change the bandage whenever it gets wet or dirty.
- Watch for infection. Seek medical care immediately if you signs of infection near the wound, such as redness, pain, pus, swelling or warmth.
For serious injuries
Seek medical attention immediately if your child:
- Has a serious fall and/or loses consciousness
- Has bleeding that won’t stop
- Has a wound that is large or deep
- Has a wound with embedded debris
- Has a wound on the face or neck
- Has a wound caused by human or animal bite
- Has a burn wound or an electrical injury
When in doubt, seek medical help immediately.
Restocking your kit
Remember to restock the items you’ve used up to keep your kit up to date. It also helps to carry multiples of commonly used items like bandages and wipes.
Resources
- Child first aid and safety: http://kidshealth.org/en/parents/firstaid-safe/#catemergencies
- How to treat cuts and scrapes: http://www.mayoclinic.org/first-aid/first-aid-cuts/basics/ART-20056711
- Anatomy of a first aid kit: http://www.redcross.org/get-help/how-to-prepare-for-emergencies/anatomy-of-a-first-aid-kit